
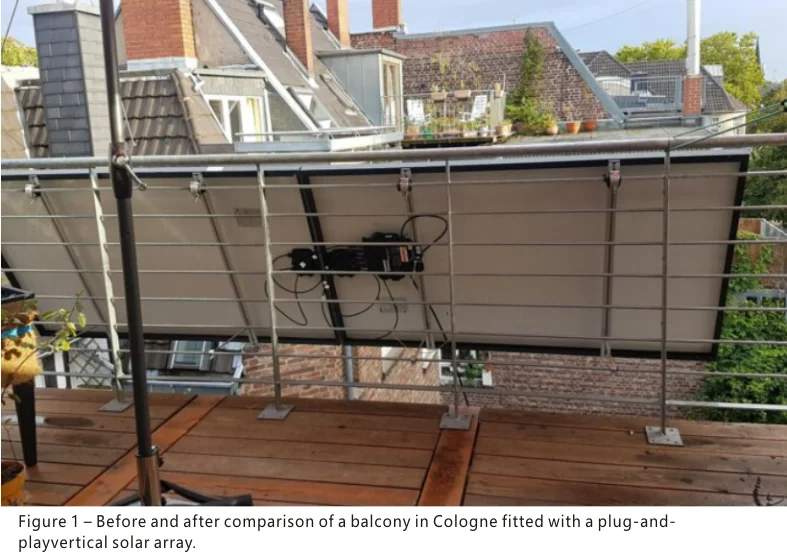
Not all balconies are created equal! Balconies on the market are built, designed, and sized in many different ways. You’ll find balconies with grilles, glass panels, or concrete; railings of different widths; posts that are square or round; and designs with or without offset structures. Many balconies cannot accommodate off-the-shelf installation kits. This article tell you how to install a balcony solar power plant, introduces various systems for creating a custom balcony solution, along with the specific steps involved.
Article Outline
- Measurement and Planning
- Purchasing Materials
- Installation on Metal Post Balconies
- Installation on Concrete Balconies
1️⃣ Step One: Measurement and Planning
First, thoroughly inspect the stability of your balcony railing. Check for any corrosion damage and carefully examine all its bolt connections. If everything is sound, you can begin measuring.
Plug-and-play solar panels must always be secured at four points. Therefore, you need at least two mounting points in both the top and bottom areas of each panel. The width or depth of the railing determines the type of clamp or hook for the top points. Installing the bottom points is often trickier than expected—not only due to a lack of suitable spots, but also because you can’t always get the access you need, often requiring work from the outside of the balcony. Sometimes you may need to work from a neighbor’s balcony below (taking all necessary safety precautions) or set up a ladder. In some cases, installation may pose excessive risk or require significant extra cost, but most of the time, a solution can be found!
Tilt Angle: Besides deciding how many panels to install, you need to choose whether to mount them parallel to the railing or at a tilt, and judge if your balcony suits the latter. Consider wind load: while tilting the panels improves light collection, it significantly increases wind load. A photovoltaic panel of about 2 square meters has an area comparable to a windsurfing sail—the force from the wind is no trivial matter. Furthermore, wind loads are significantly greater on the tenth floor than on the ground floor, and they create a lever effect on the railing. For maximum safety, it’s recommended to mount the panels vertically.
Finally, measure the required cable length and check your wiring point: Is there an outdoor socket, or can one be installed? Can the cable be routed indoors? If neither is possible, flat cables are an alternative, but this requires the microinverter to be installed indoors—a point to consider during your cable planning.
2️⃣ Step Two: Purchasing Materials
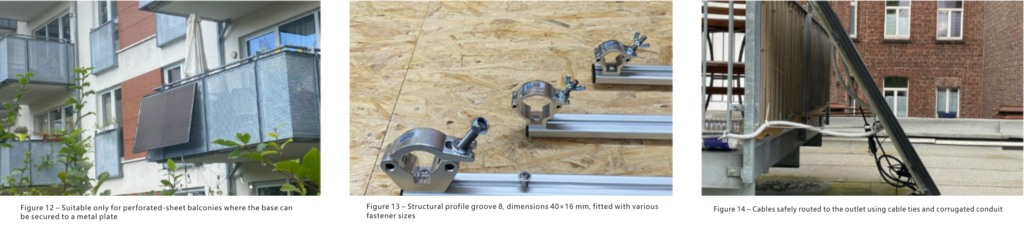
The system for custom-mounting your panels should be as robust and safe as ready-made kits sold online. Rust-resistant and durable materials like aluminum alloy or stainless steel are ideal. We recommend industrial profiles from Item or similar brands (Type 8 slotted profile, see Figure 13). These standardized profiles offer ample stability when professionally installed, are available online, and the 40×16 size is quite versatile. T-slot nuts, bolts, hinges, and connectors can all be selected to match the Type 8 profiles. T-slot nuts screw into the profile’s channel; when you tighten a bolt into the nut’s thread, it locks automatically. Hammer-in T-nuts can also be used, but they risk working loose and letting the entire panel slide down. To avoid this, you can drill directly into the profile track instead of using a nut—later, align the track with the panel’s pre-drilled mounting holes, tighten, and secure with lock nuts.
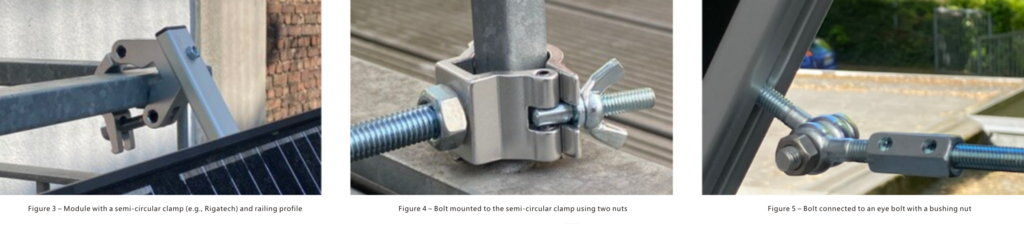
The top mounting points on the balcony are usually best suited for aluminum or stainless steel saddle clamps (like the Rigatech brand, see Figure 3). TÜV-certified, each clamp can bear up to 200 kg and is fixed to the panel via aluminum profiles. For concrete balconies where standard market hooks don’t fit, you can create custom hooks using profile tracks and compatible corner brackets (see Figure 8).
If you need a tilted installation, you’ll typically require M8 threaded rods, compatible sleeve nuts, eye bolts, T-slot nuts, and lock nuts (see Figures 5, 6). For the support structure shown in Figure 9, you’ll need: 8 saddle clamps, 4 profile tracks, 4 threaded rods, 16 eye bolts, 8 sleeve nuts, 4 T-slot nuts, and several bolts with lock nuts. These parts are available at hardware stores. The cost per panel for such a custom solution is roughly €60 to €100.
3️⃣ Step Three: Installation on Metal Post Balconies
Start by pre-assembling the support structure on the panel. Each panel’s frame has at least four pre-drilled holes for mounting profile tracks or hooks. Never drill additional holes in the frame—this voids the warranty. The panel shouldn’t hang only from the top holes, as this puts excessive stress on one side. Therefore, before using two hooks to bear the full weight, install a profile track, perforated strap, or angle bracket between the hook and the panel frame (see Figure 8).
Pre-assembly can be done on the balcony or indoors. Most plug-and-play panels come with a pre-installed microinverter; you only need to attach the profile tracks, corner brackets, or clamps to the panel.

Next, handle the wiring: plug the panel’s connector into the inverter’s input. The cables have polarized MC4 connectors, so it’s hard to plug them in wrong. The inverter connects via another cable to a Schuko socket (a German standard outlet) or a Wieland socket (for grid connection). Some inverters only have short cables with “battery-type” plugs and require an extension cable (e.g., battery plug to Schuko plug). Protect cables from UV exposure and secure them against rain and abrasion. Use UV-resistant cable ties and corrugated conduit for protection (see Figure 14).
After pre-assembly, mount the panel on the railing. The panel’s weight and size are often underestimated—standard panels are bulky and can weigh up to 25 kg, so team up for this step. Ideally, three people work together: two hold the panel steady while the third tightens the mounting system to the railing. Screw the clamps onto the railing, loosen the lock nuts on the profile track, and adjust the hinge to set the panel angle.
Finally, add a safety tether using a steel cable about 5 mm in diameter to prevent accidental falls: thread it through the profile track and behind the panel, then fasten it around the entire balcony or a single metal post. Once plugged in, the panel generates power and the inverter’s indicator flashes red. When connected to a live outlet, it turns to a flashing green, showing normal operation and grid feed-in.
4️⃣ Installation on Concrete Balconies
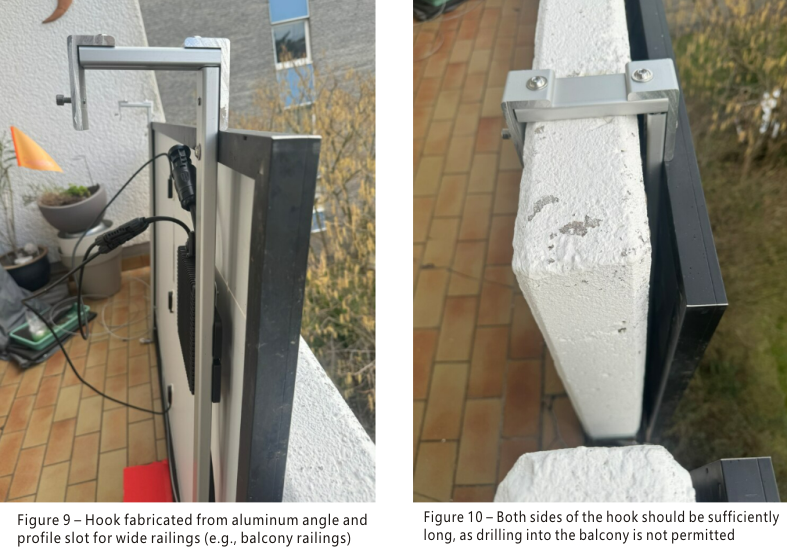
If drilling into the concrete is prohibited, consider a clamp-on mounting method. You still begin by fixing the aluminum profile track to the back of the panel, assembling it with corner brackets and cut profiles into hooks that hang over the railing (see Figures 9, 10).
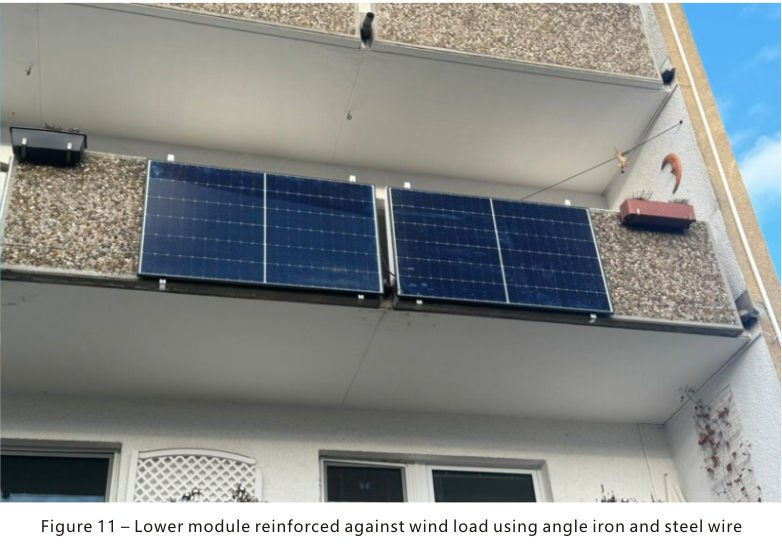
You have a few options for securing the panel. If accessible, you can bolt the balcony and profile track together from below using corner brackets. If access from below isn’t possible, corner brackets can also prevent upward movement without drilling (see Figure 11). However, in this case, you must use an additional steel cable—pull the panel’s aluminum support tight against the concrete balcony to prevent any up/down or forward/backward movement. This solution only works if the balcony isn’t fully sealed to the wall, allowing the cable to be wrapped around and secured.
Important Note: Clamp-on installations should only be carried out by experienced technicians to ensure long-term structural stability.